Set Up OneLogin SAML Custom Connector (Advanced) Application
Ensure that you have Administrator access to your OneLogin Account and Trust3 AI.
Follow these steps to create and configure a OneLogin application for Single Sign-On (SSO) using a SAML Custom Connector (Advanced).
Step 1: Add a New Application
- Log in to your OneLogin Admin Console.
- From the top menu, select Applications and then click Add App.
- In the search bar, type "SAML Custom Connector (Advanced)" and select it from the results.
Step 2: Provide Basic Information
- In the Info tab, provide a descriptive name for your application in the Display Name field.
Example:Trust3 AI SSO - OneLogin - (Optional) Upload a logo for the application if needed.
- Click Save to proceed to the next configuration step.
Step 3: Configure the SAML Settings
- Go to the Configuration tab.
- Fill in the following fields based on your SAML metadata information:
| Field | Value Example | Description |
|---|---|---|
| ACS (Consumer) URL | https://na.trust3ai.com/SingleSignOnService/receiveResponse | The Assertion Consumer Service (ACS) URL where SAML responses will be sent. |
| ACS (Consumer) URL Validator | https://na.trust3ai.com/SingleSignOnService/receiveResponse | A regex pattern that matches your ACS URL for validation. |
| Login URL | https://na.trust3ai.com/loginv1.html | The URL for login initiation. |
| SAML Audience | trust3ai_portal | Entity ID for SAML configuration. |
Step 4: Configure Parameters (Attribute Mapping)
- Go to the Parameters tab.
- Click + Add Parameter and add the following attributes to map user data:
| Field Name | Value to Send | Include in SAML Assertion | Sample Value | Description |
|---|---|---|---|---|
UserId | UserName | ✔ | UserName | Sends the user’s unique identifier. |
Email | Email | ✔ | Email | Sends the user’s email address. |
FirstName | FirstName | ✔ | FirstName | Sends the user's first name. |
LastName | LastName | ✔ | LastName | Sends the user's last name. |
memberOfGroupNames | User Roles | ✔ | User Roles (Semicolon Delimited input ) | This is an optional attribute that sends the list of groups the user belongs to. Select the checkbox for multi-value parameters |
- For each parameter, ensure you select the checkbox for Include in SAML assertion.
- For the
memberOfGroupNamesparameter, in addition to selecting Include in SAML assertion, also select the checkbox for Multi-value parameter to support multiple groups. - Click Save to proceed.
Step 5: Assign Users to the Application
- Go to the Users tab.
- Click + Assign and select Users or Groups.
- Choose the users or groups you want to assign and click Save.
Important
Ensure users are already mapped to the appropriate groups in OneLogin before assigning them to the application.
Step 6: Obtain the SAML Metadata
- In the SSO tab, locate the Issuer URL and SAML 2.0 Endpoint (HTTP).
- Copy both URLs for later use in the Trust3 AI portal.
Step 7: Review Your Configuration
- Review all the entered information and confirm that it is accurate.
- Click on the Save button.
You have successfully set up a SAML Custom Connector (Advanced) in OneLogin. This configuration is now ready to be integrated with the Trust3 AI portal for Single Sign-On (SSO).
Configure OneLogin in your Trust3 AI account.
In Trust3 AI, follow these steps to access the Single Sign-On settings:
- Go to the Settings menu.
- Navigate to Identity.
- Enable Single Sign-On.
Reference image from Trust3 AI for better guidance: 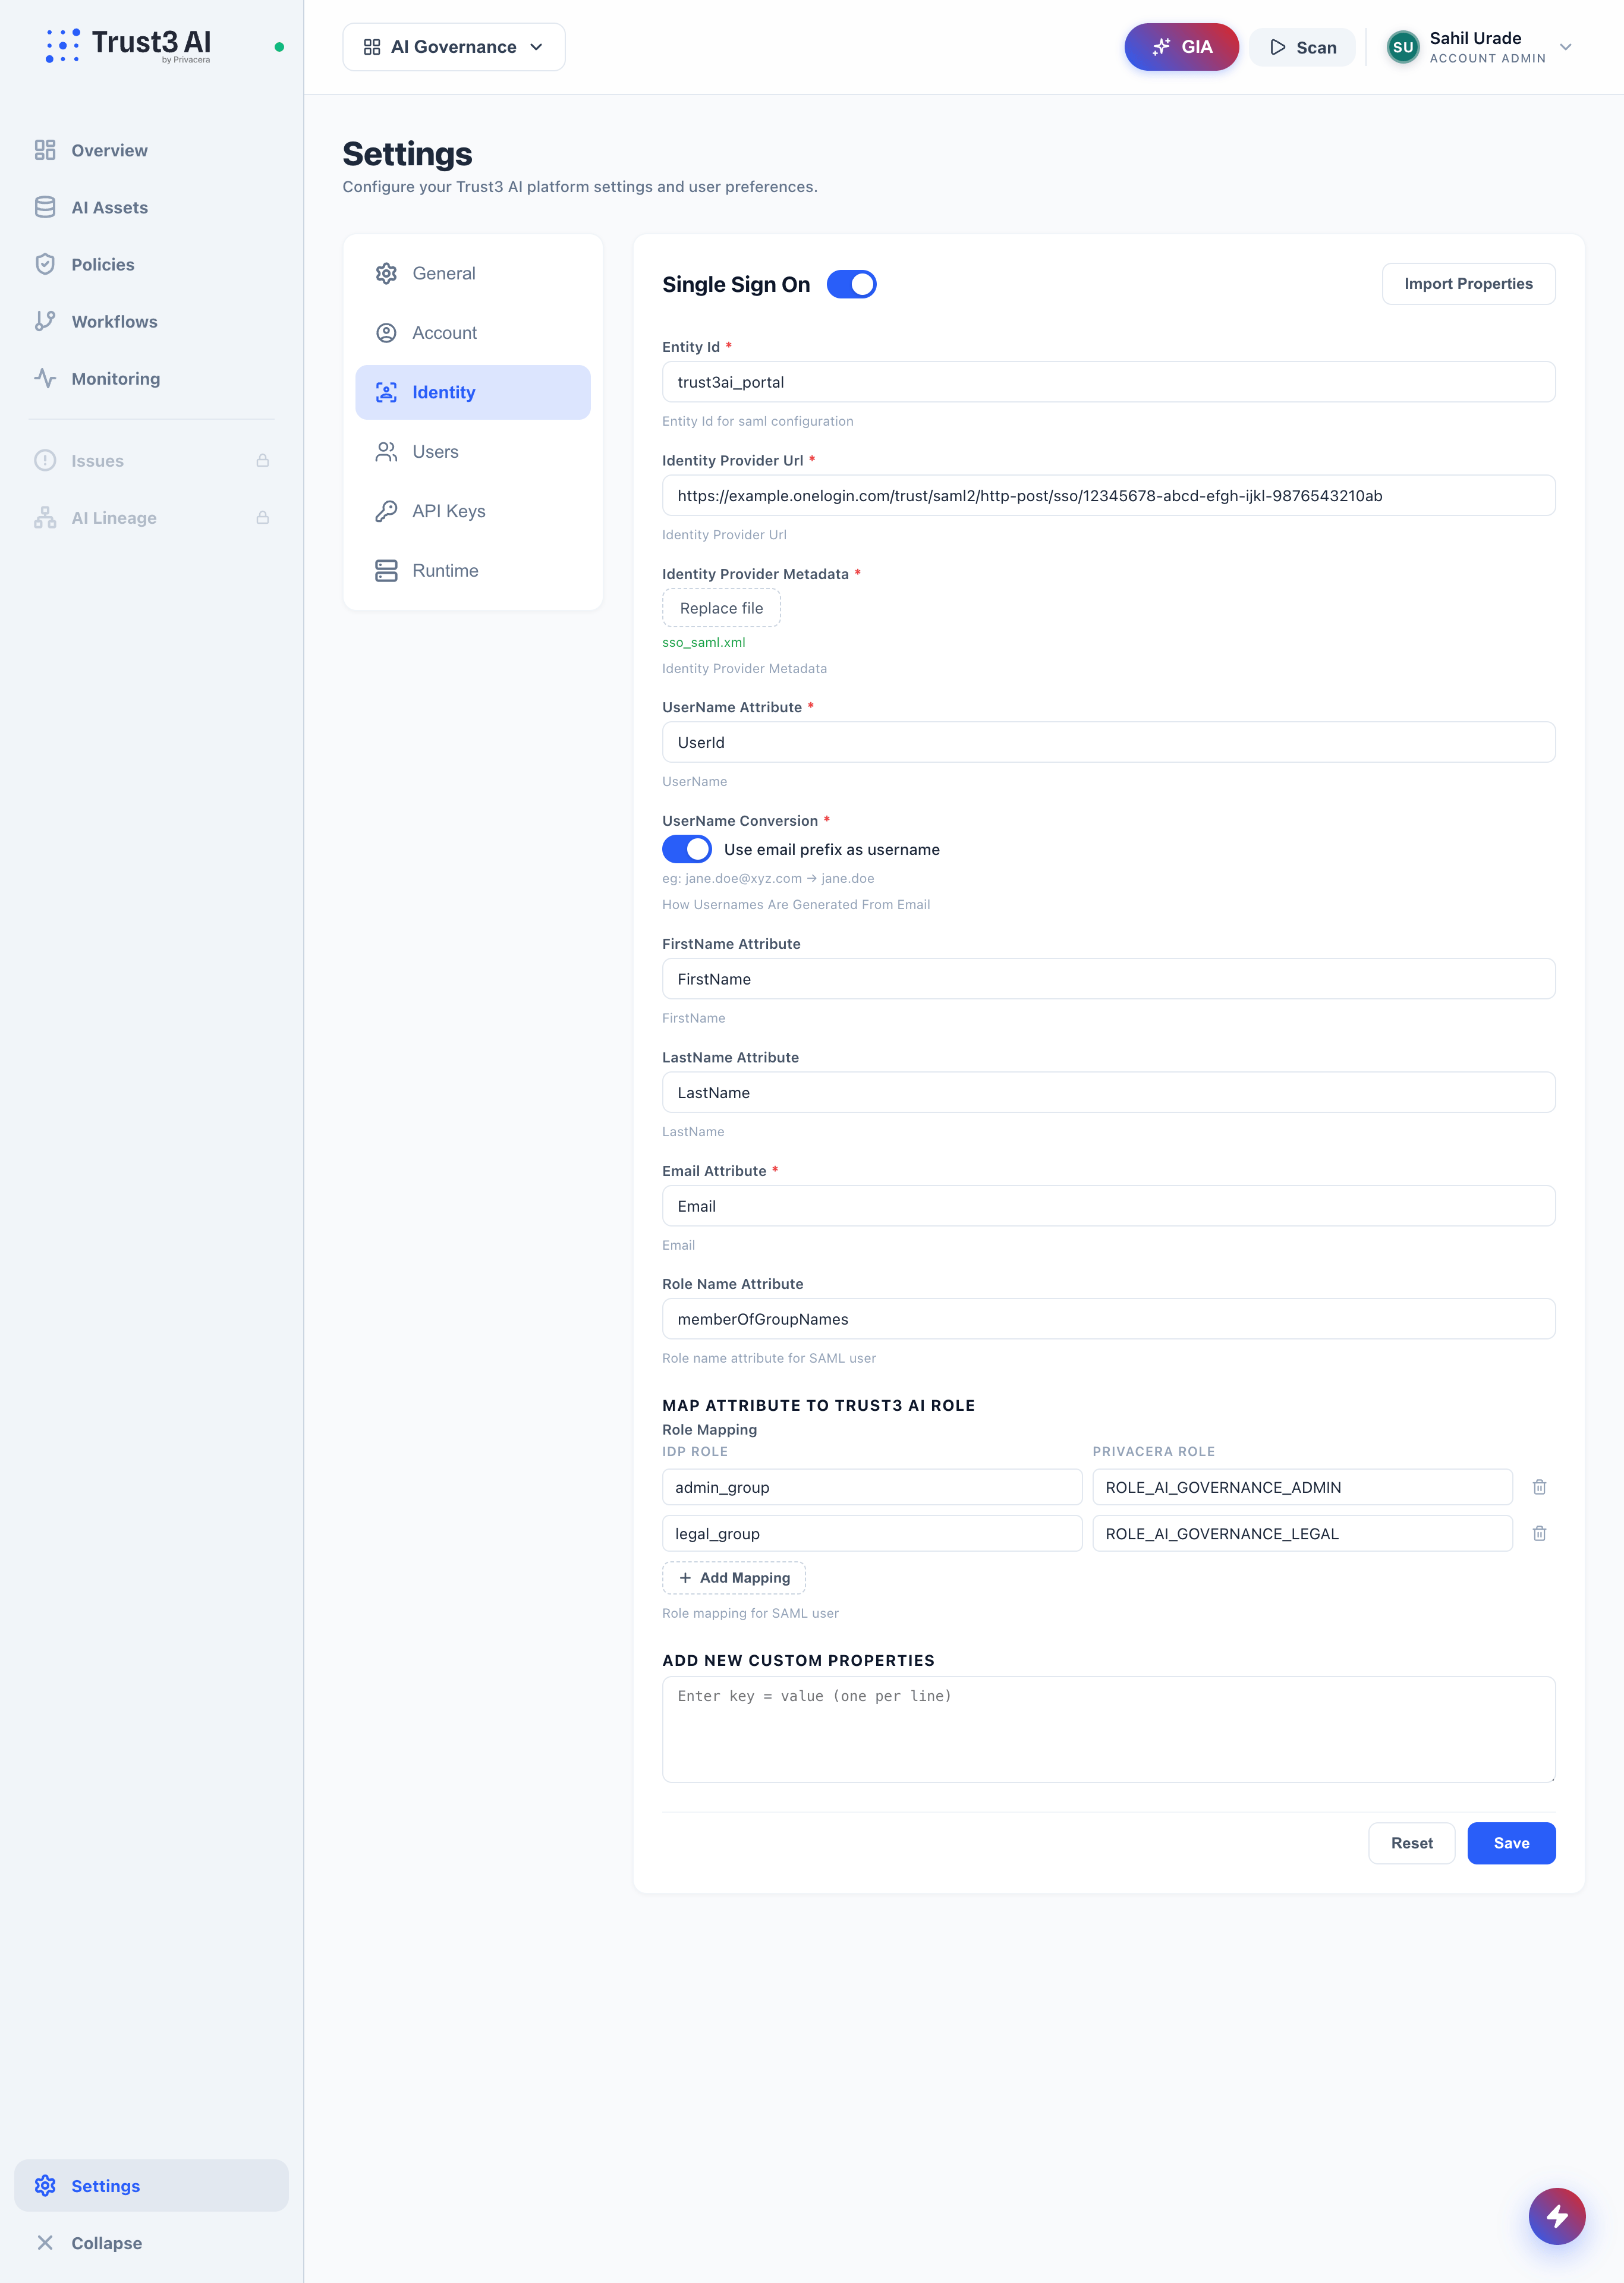
| Display Name | Description | Example Value | Optional/Required |
|---|---|---|---|
Entity Id | Entity ID for SAML configuration | trust3ai_portal | Required |
Identity Provider Url | Identity Provider URL | https://example.onelogin.com/trust/saml2/http-post/sso/12345678-abcd-efgh-ijkl-9876543210ab | Required |
Identity Provider Metadata | Metadata (XML file) | sso_saml_darth.xml | Required |
UserName Attribute | UserName attribute for SAML user | UserId | Required |
Email Attribute | Email attribute for SAML user | Email | Required |
FirstName Attribute | FirstName attribute for SAML user | FirstName | Optional |
LastName Attribute | LastName attribute for SAML user | LastName | Optional |
Username Conversion in SSO
This setting determines how usernames are generated during SSO login when the Username Attribute value contains an email address.
Username Format Options
-
When the toggle is ON: The system uses the email prefix (the part before @) as the username. Example:
jane.doe@xyz.com→jane.doe -
When the toggle is OFF: The system uses the full email address as the username. Example:
jane.doe@xyz.com→jane.doe@xyz.com
Important Considerations
Possible Conflict: Email Already in Use
A conflict may occur if the email address is already associated with another user in the system. This may prevent successful login or account linking during SSO authentication.
Example Scenario: When a user attempts to log in with email jane.doe@xyz.com, but this email is already associated with username jane.doe, the login will fail due to the conflict.
Resolution Steps: An administrator must delete the existing user from Settings → Users, then ask the user to sign in via SSO again.
Configuration Impact
- New SSO logins will use the configured username format
- Existing users will be affected by this change on their next login attempt.
Troubleshooting
If you experience issues with SSO login, refer to the SSO Login Troubleshooting Guide for detailed steps and solutions.
Important
- Entity ID: Used to configure the Identity Provider (IdP).
- Identity Provider URL: URL obtained in Step 6, where users will be redirected for SSO login.
- Identity Provider Metadata: Use the Metadata XML file downloaded in Step 6 for seamless SSO configuration.
- User Attributes: Ensure that the correct user attributes (
UserId,Email,FirstName,LastName) are mapped from OneLogin to Trust3 AI.
These variables ensure seamless integration between OneLogin and Trust3 AI for SAML-SSO.
Role Mapping For OneLogin
Role mapping allows you to translate roles or groups from your OneLogin Identity Provider (IdP) into specific roles within Trust3 AI. This ensures that users have the correct permissions and access when they log into Trust3 AI.
What is Role Name Attributes?
This attribute in your Identity Provider (IdP) contains the user's roles or group information. It identifies the roles or groups the user belongs to in the IdP.
What is Role Mapping?
This configuration maps roles or groups from the Identity Provider (IdP) to corresponding roles in Trust3 AI. If a specific role from the Identity Provider (IdP) matches a role defined in the role mapping configuration, that role is assigned to the user in Trust3 AI. If no mapping is defined, the default role, ROLE_USER, is automatically assigned to the user.
| Variable Name | Description | Example |
|---|---|---|
Role Name Attribute | Role name attributes for user. | memberOfGroupNames |
Role Mapping | Role mapping for user. | Identity Provider (IdP) Role: example_role → Example Role: ACCOUNT_ROLE |
Reference image of Role Mapping from Trust3 AI: 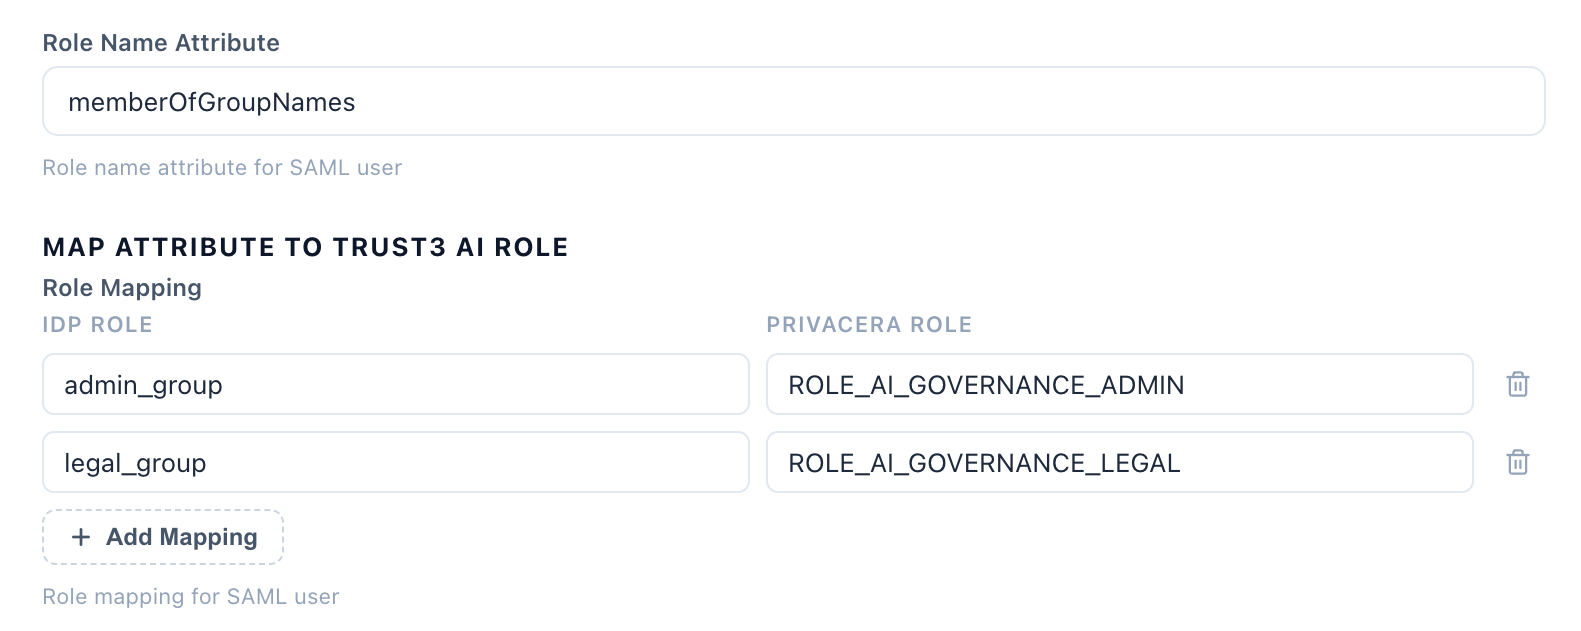
Example:
- Identity Provider (IdP) Role or Group:
one_role_admin - Mapped Trust3 AI Role:
ACCOUNT_ADMIN
In this example, if a user has the role one_role_admin in OneLogin, they will automatically be assigned the ACCOUNT_ADMIN role in Trust3 AI.
Important
New Users:
Role mapping only applies to newly created users after the mapping has been configured.
By properly configuring role mapping, you ensure that users are granted appropriate access levels within Trust3 AI based on their roles or group memberships from the Identity Provider (IdP). This simplifies user management and ensures seamless integration with your organization’s existing identity infrastructure.
Once the configuration is complete, you can test the setup by attempting to log in to the Trust3 AI using your OneLogin credentials. This will help verify that the Single Sign-On (SSO) integration is working correctly.